How to Set Up a WordPress Website
So, you’re ready to get started with your own WordPress website. That’s not a bad idea. Based upon a survey of content management systems (CMS) used to publish content on the web, WordPress came in first by far at 41% (as of April 2021). The second place CMS according to the survey (Shopify), had only a 3.4% market share.
There are lots of great reasons why you’d want to choose WordPress to host your blog, your business website, your ecommerce store, or whatever else you want to publish online. It’s not very difficult to set up (as I’ll show you in this article), and WordPress gives you very flexible options (including a selection of over 50,000 plugins that you can use to do everything from setting up a contact form to migrating a WordPress website from one host to another.

Two Ways to Set Up a WordPress Website
There are essentially two different ways to set up a WordPress website: manually or through an automatic install.
Manually Versus Automatic WordPress Installations
If you have some technical background and want to manually install WordPress, the process is pretty straight forward. As long as you have a decent understanding of how your web hosting control panel works, you know how to set up a MySQL database, and you know how to get around your web host’s file system, you can do a manual installation. One of the advantages I’ve experienced with doing a manual installation is that you know exactly how the WordPress install was done, so if you run into any problems later, you can better troubleshoot the installation.
WordPress and Your Technical Know-How
Compared to some simpler content management systems (such as what you’d find with Wix and SquareSpace), WordPress can require a bit of technical know-how, especially if you want to do something custom, something for which there isn’t a simple plugin.
As demonstrated by the sheer number of people who use WordPress, its accessible to technical and non-technical types alike. For those who don’t like to get into the nuts and bolts of designing, building, and maintaining a website, but who want to use the power and flexibility of WordPress, you can always hire a technical helper using Fiverr or another outsourcing platform.
If, on the other hand, you’d rather use an automatic WordPress installation, you can go that route. WordPress has been set up with an easy 1-click installation that is integrated the control panel for web hosting companies. There are four different types of auto-installers that are integrated with the most popular web hosting companies (for instance, WP Engine, BlueHost, HostGator, and others):
- Plesk: the Plesk control panel is available on HostGator.
- Fantastico: the Fantastico control panel is available with GoDaddy hosting.
- Installatron: Installatron is also available with GoDaddy hosting plans.
- Softaculous: Hostgator has the Softaculous auto-installer tool available with its hosting plans.
For instructions on how to install WordPress using one of these auto-installers, follow the instructions provided by WordPress. These WordPress auto-installer tools are simple enough to use that the hardest part of the process is simply choosing which host you prefer, as long as they have an auto-installer available.
Manual WordPress Setup How-To
Download the Latest Version of WordPress
To install WordPress on your web server, you’ll need to get the latest version of the WordPress software files. You can download those from the official WordPress download page. WordPress publishes their software as a compressed .zip file.
Upload the WordPress Zip File to Your Server
Once you’ve downloaded the compressed WordPress files to your computer, you will need to upload them to your web server. Most Linux web hosts that use cPanel software for their control panel setup a home directory that looks like this: /home/[useraccountname]/public_html (where useraccountname is the username you used to set up the account).
Upload the WordPress .zip file to this public_html directory on your web server if you’re using cPanel. If your web host has a different setup for publishing the root home directory, you’ll need to find out what that directory is and upload your WordPress .zip file there.
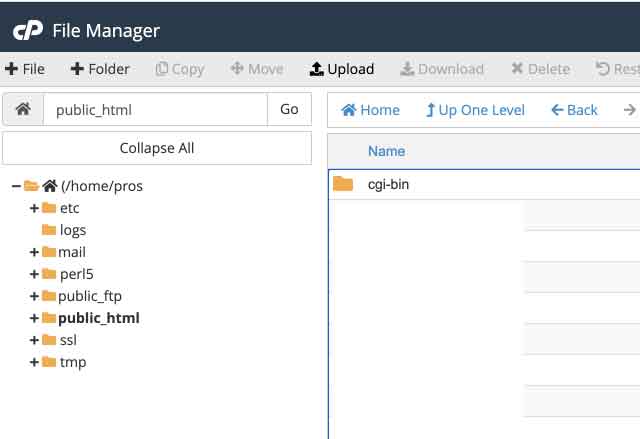
Most web hosts have a file manager that you can access through the browser, as shown below.
Click on the Upload button, and upload the WordPress .zip file here. If you’re proficient with the scp Linux tool, you can use that to copy the .zip file to the root folder of your web hosting account.
Unzip the WordPress Files
When you extract the WordPress files, the contents will be contained in a folder called “wordpress”. To make it so that your website isn’t contained in a wordpress sub-folder (e.g. mywebsite.com/wordpress/ versus just mywebsite.com), you’ll need to move all the contents of the extracted folder labeled wordpress and move them into the root folder of your domain.
Set Up a MySQL Database
The next step in this process is to set up a database that WordPress can use to operate, including to store information about your site and about your WordPress installation and any plugins that you end up using.
Most web hosts have a section for database creation, and the process for setting up a new one is fairly straightforward. If you need help, you should be able to get help from your hosting provider’s support team.
In this step, you’ll:
- Set up a MySQL database
- Set up a MySQL user that has access to the database
- Give your MySQL user privileges on the database
Running the WordPress Install
After you have put the WordPress files where they need to be (in your web root folder), and you’ve created a database along with a database user that has read and write privileges for the database, you’re ready to run the WordPress install.To run the WordPress install, you simply access your website (or IP address if you don’t yet have the domain set up for this website you’re creating) domain and add /install at the end of the URL, like this: https://mywebsite.com/install
If you’ve set everything up correctly, access this install URL will take you through the WordPress installation process, and you’ll be off and running.